.png?height=120&name=Plantiga%20lockup%20black%20(1).png)
Collect data with the insoles to capture movement insights
What is an Activity?
An activity is when you use your pods to collect movement data. To collect data for an activity, all you need to do is have pods in your shoes, start a stopwatch, and do the type of activity you’ve selected.
This guide will walk you through those steps to collect your first walk activity - when you’re done, you’ll be able to view metrics from your first walk!
Before you start, make sure you’re ready to go with pods paired to the person you’re assessing. Don’t know what that means? Read more here.
1️⃣ Make sure your pods are ready
Your pods need to have enough battery charge and storage space to run the activity. If your pods are docked and the lights are green, you’re ready to go!
If not, leave them on the dock until they turn green.
Tip: You’ll also be able to see your pod status on the People page next to your name and in the notifications box - if your pods say Ready you're good to go.
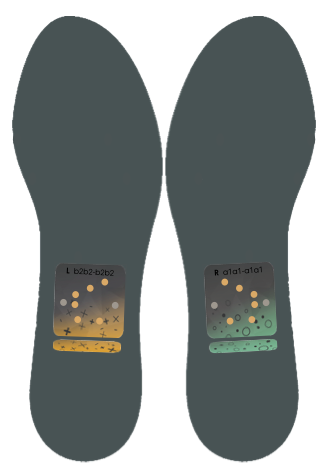
2️⃣ Put your pods in your insoles and your insoles in your shoes
If your pods aren’t already in your insoles, velcro them in. Make sure the right pod is in the right insole (and vice versa) and they’re oriented right-side-up. Here’s what they should look like:
Slide your insoles into your shoes. You can use your Plantiga insoles either with the insole that comes with your shoe or instead of it, whichever is more comfortable.
3️⃣ Get set up
We’ll do a walk activity first. If you’re running the activity on yourself, do the next steps on your phone instead of your computer so you can carry your phone with you as you walk.
Open up plantiga.io and click on the Stopwatch. You’ll see a list of activity types. We’re doing a walk activity, so click on Walk.
Click Next, then select your name from the list of people and click Confirm. Verify that the correct pods are paired to you and that there are no errors that need your attention. For more information about what to do if you seen an error, click here.
4️⃣ Walk around
You’ll be walking for one minute. Make sure you’re in a spot where you can walk around, like a hallway or a large room.
Once you click the green play button, your activity begins.
You must stand still for 5 seconds at the beginning and the end of each activity in order for our algorithms to process the data. Once the screen says Go, start walking.
You’ll see the timer running on the activity page. Walk at a consistent pace for one minute and press the stop button. Again, stand still for five seconds, until the countdown is finished.
TIP: if you navigate away from this page, click on the Stopwatch again to see all running stopwatches at the top of the page.
5️⃣ Add info and save your activity
Once you have finished, fill in all of the info for your activity that you'd like to track.
- Name: you can give your activity a name, like “My First Walk Activity”
- Rate of Perceived Exertion: How much effort was this activity?
- 1 = easy, like walking slowly on a flat track
- 10 = hard, like sprinting uphill with a heavy backpack
- Surface Type: What surface are you walking on? Grass? Hard floor? Treadmill?
- Pain Rating: Did you experience physical pain during the activity?
- 0 = no pain at all
- 10 = worst pain experienced
- Labels: Labels are meant for tagging consistent themes for multiple activities, such as a treadmill speed setting or shoe type, that you'd like to compare later.
- Notes: Add anything else you want to jot down that might have a bearing on the activity performance, like environmental extremes or time since injury.
Once you’re finished filling out the info, click Done.
6️⃣ Upload your activity data
Now that you've finished recording your activity, you can upload your data. You should have installed the Cloud Connector on your computer when you set up the Plantiga system. Make sure it’s running by clicking on the Cloud Connector icon in your menu bar and checking for the message “Connected to the Plantiga Cloud.” Make sure your dock is plugged in to the computer and connected - you’ll see your dock ID under Connected Docks.

To upload your activity data, place your pods on the dock. They will click into place when they’re on the dock in the correct orientation. Once the lights turn solid yellow or orange, your activity data has finished uploading.
To see how much data you have left to upload, you can click on the people page - the pod chips next to your name will show a progress bar for how much data is left to upload.
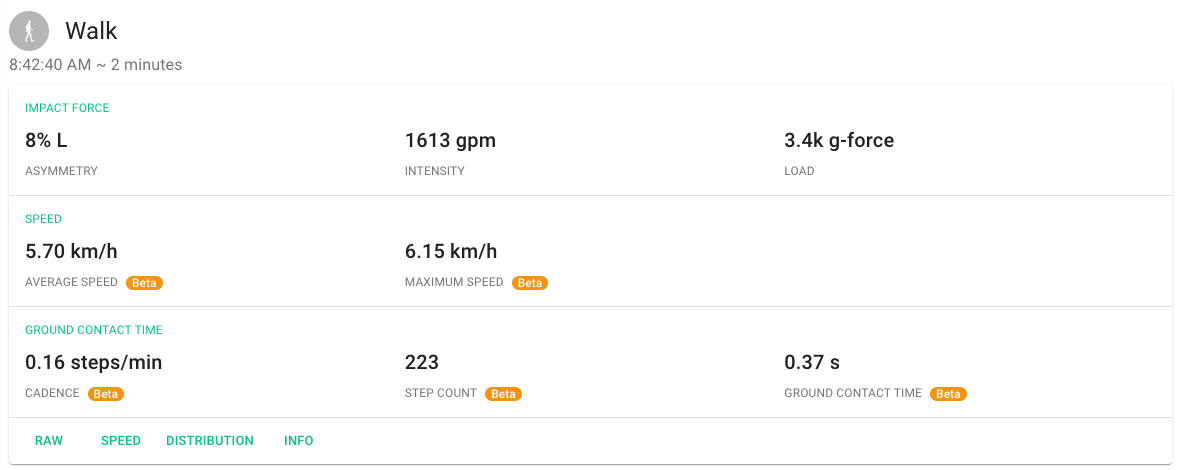
7️⃣ Review your data
Once the pods have finished uploading, you will be able to see your data on plantiga.io. Click on your name on the People page to go to the DAILY tab to see a summary of metrics for your walk test. You should see something like below:

You can check out the Raw data or the Speed profile here or click on the REVIEW tab and then on the Walk View! to get a more in depth look.
Congrats on completing your first assessment!
Here are some good next steps:
➡️ Read up on Views
➡️ Collect a full suite of Baseline activities
➡️ Learn more about why Walk assessments are so important